Cheep rim light More possiblities
I was looking through the TF2 Illastritive rendering paper again: http://www.valvesoftware.com/publications/2007/NPAR07_IllustrativeRenderingInTeamFortress2.pdf
and wanted a quick way and easy way to get a rim light in the BGE.
Did a quick google search and found this post on blender artist:
image from post

This was the result he got from this technique .
He uses a circle black and white map like this:

with these instructions
"
-Now create a texture with this image in the material you want to be rim shaded.
D
-Next select "Nor" for normal in the "Map Input" tab
-Use Size X and Size Y to adjust the size of the rim. In the above image I used .75 for both with the example texture
-Now go into the "Map To" tab and de-select "Col" (colour) and select "Emit"
"
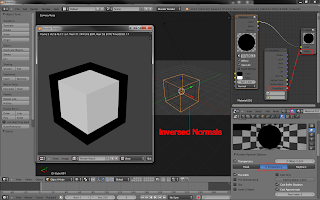
I had never used the Nor element in this section and am still not entirely sure on how it works. I thin it uses this circle map from the middle of the model mass(could be completely wrong.)
But ran some tests with adjusting the size of the circle, shape and inverting the colour. Inverting the colour gave an effect of almost giving an object an in-line pose to an outline. If this could be a possible solution it could eliminate the need for multiple copies of the mesh like in other examples to far. when seen at extreme angles the effect breaks a bit but it has some potential.
I thought back to the post man demo from the start of this project
http://alshonours.blogspot.co.uk/2012/09/test-time.html
I used an example shader here:
this technique only worked at render time as it used a compozit node instead of material. It samples the rendered texture and applies proses to it. The main problem is that it had ambient occlusion turned on in the render to get the nice falloff. AO dose not work real time in BGE,(There is screen space AO custom 2d filter but cant easily add an image overlay on top)
Image not mine from link above

So i took this mesh into blender and started playing with this new technique. Realised that a circle like this :

this made a very thin outline around the inside the character

I then made the circle smaller

and got this result

It looks funny at cretin angles but it works.
Can now use this to in-force the dark edges seen in the original image.
Going back to the original inverted circle I made a nice fall of and tweaks lots to get here:

I realised that this image also need a mesh outline to reinforce the dark areas round the shape. This image is still not there but it is getting closer to matching the original render. one of the main problems is the size of the overlay image in the view space. I still don't understand the scaling with that.
This test went a little off topic but it shows that some techniques inform and inspire similar techniques and jumping in and testing is always worth it.

You can achieve the same effect without any images, using the "RAMP" checkbox in the diffuse color options of the material. Then change the input to normal, or whatever suits your purpose
ReplyDeleteThanks for pointing this out , ye took a little to know what options you were meaning. Ye works good, but cant turn shadeless on like you can with images, and dono a way to isolate highlights and shadows using the ramp method aether. Think theres more options with a couple images. Il post highlights and shadow tests soon.
Delete